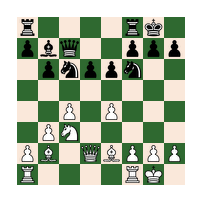
Capablanca-Euwe 1931 candidates’ match, Game 2 [Event "Capablanca - Euwe"] [Site "Amsterdam, The Hague, Rotterdam and Scheveningen NED"] [Date "1931.07.14"] [Round "2"] [White "M. Euwe"] [Black "J.R. Capablanca"] [Result "1/2-1/2"] [ECO "E44"]{ <sub><em>Click or tap on a move in the game text for a popout display board.</em></sub></br>[#]} 1. d4 {</br> Euwe much preferred 1. d4, but he wasn’t a specialist. He was halfway between Capablanca — who played 1. e4 and 1. d4 equally — and the ninth world champion Petrosian, who played 1. d4 exclusively.</br>} 1... Nf6 {</br> When a draw was suitable, Capablanca was almost invincible with 1…d5. If he felt more ambitious, then 1…Nf6.</br>} 2. c4 {</br> 2. c4 is White’s most ambitious play. 2. Nf3, 2. e3, 2. Nc3 are quite safe and sound, but don’t dissuade Black from balancing the center with 2…d5. </br>} 2... e6 {</br> 1…Nf6 plus 2…e6 is the move order favored by masters, in a large part for the flexibility. Black can still reach a sturdy Queen’s Gambit Declined with 3…d5, while the sharp 3..c5 remains on the table.</br>} 3. Nc3 {</br> These days, masters play 3. Nc3 if they’re willing to face the Nimzo-Indian, proven to be very active while completely sound. In 1931, the theoretical discussion was still fresh. </br>} 3... Bb4 {</br> Capablanca knew a good thing when he saw one while Nimzovich was pleased to claim Capablanca as a supporter.</br>} 4. e3 {</br> At Carlsbad 1929, Euwe played Capablanca’s 4. Qc2 against Capablanca, a wildly unbalanced draw. Against most players, there’s some psychological gain by playing their inventions or pets against them, but Capablanca was above chess psychology. When he was White, 4. Qc2 meant the avoidance of doubled pawns. When he was Black, 4. Qc2 meant White might move his queen three times in the first 10 moves.</br>} 4... b6 {</br> A reason to leave the d7-pawn unmoved is so …Bc8-b7 has its longest range.</br>} 5. Nge2 {</br> The correct expression of White’s 5th move is “5. Ne2”. There’s no ambiguity because the c3-knight is pinned, ruling out “Nce2”. Most software that reads chess notation doesn’t take that into account, and barfs on “5. Ne2”.</br> It’s more desirable for White to recapture on c3 with the knight than with the pawn, or the queen. 5. Ne2 blocks the f1-bishop, but White’s rationale is: The c8-bishop is moving to b7 next, so I’ll keep an eye on g2 while preparing to retake on c3 with my knight, and my bishop is doing something useful. For this subtle distinction, most players with Black play 4…O-O, when White should logically play 5. Bd3 before Ng1-e2 hems it in. The bishop is sometimes a useless spectator on d3, so White doesn’t mind leaving it on f1, especially if it’s working in a fashion. </br> These are such slight considerations in opening move order, but if you listen to modern 1900-rated players, they’re life-and-death matters. To them, 4…b6 and 5…Bb7 is a miserable misplay, though the only real goal in the opening is to reach a decent middlegame, and minute distinctions like this don’t matter. </br>} 5... Bb7 {</br> Here’s <em>another</em> subtle distinction in move order: Today’s top-flight nasters — and fashion-conscious 1900 players — play 5…Ba6, forcing White to make a decision about the c4-pawn. If Cecil Purdy were alive today, he’d laugh at how painstaking modern 1900-rated players can be about opening move order, when it obviously didn’t concern Capablanca.</br>} 6. a3 {</br> An ideal time to question the bishop, when the e2-knight is eager to retake on c3, and free the king bishop.</br>} 6... Bxc3+ {</br> Neither of Black’s choices is appealing. Black is gasping for breathing room on 6…Be7 7. d5, while 6…Bxc3+ 7. Nxc3 gives up the bishop pair when White can make the most preferred recapture. The most successful move is 6…Bd6; Black reasons that he doesn’t want to play …d7-d5 anyway, and e7 is open for a queen development. Grandmasters Timman and Morozevich saw the logic in that, though it must be uncomfortable knowing that a typical plan for White is Ne2-g3, Bf1-d3, e3-e4, and your bishop could be forked.</br>} 7. Nxc3 {</br> White’s position is comfortable, while Black lacks a device to open the game for his better-developed pieces.</br>} 7... O-O {</br> Black banks on his lead in development offsetting his disadvantage in space, but that lack of space suggests to some that they should swap another piece to relieve the cramp. Grandmaster Moiseenko makes a living out of 7…Ne4 8. Qc2 Nxc3, with four wins and two draws.</br>} 8. d5 {[#]</br> Nimzovich’s idea for 3…Bb4 was to capture on c3 to double the c-pawns before coaxing the white center pawns to d5 and e4. Then Black’s scheme was erecting a black-squared pawn wall on e5-d6-c5, using three pawns to restrain four white pawns (entombing a bishop on d3), then opening fire on the immobile c4-pawn with ….Ba6 plus ….Nb8-c6-a5 <em>(diagram 1 below).</em></br> Look at the difference in the position at hand, in which White played d4-d5 voluntarily: A blockade on c5 won’t stand because the white b-pawn is ready for b2-b4, instead of doubled and immobile on c3. With 8. d5, White assumes a commanding presence in the center, shuts out the black minor pieces, and can decide later about expansion on either wing — part of the usual Nimzo-Indian blockading plan is that White’s only option for growth is on the king’s wing, but that’s not so this time.</br>} 8...Qe7 {</br> Black has to make do with the space he has, and 8…Qe7 dissuades White from e3-e4 to take an even greater share of the board while freeing the queen bishop.</br>} 9. Be2 {</br> 9. Bd3 would break the connection between te d5-pawn and the queen.</br>} 9... d6 {</br> For the good of the queen knight.</br>} 10. O-O {</br> Squaring the development and the king safety. </br>} 10... c6 {</br> A tough pill to swallow for blocking the bishop and weakening the d-pawn, but White can’t be allowed a carefree expansion.</br>} 11. dxe6 {</br> It’s instinctive to look at 11. e4 for maintaining the beachhead, but Black will exchange on d5 until that isolates a white pawn, when White’s strength becomes a weakness. (The same thinking applies to 1. e4 Nf6 2. e5 Nd5 3. d4 d6 4. c4 Nb6 5. exd6 in the Alekhine Defense, where White settles for a lesser space advantage rather than risk the e5-pawn turning into a liability.) The c4-pawn still confers some advantage in space (Go players can win their games with one more point of space; chessplayers should be similarly temperate). </br>} 11...Qxe6 {</br> 11…fxe6 captures toward the center and opens the line for the rook, but Black takes on yet another weak pawn, with no clear plan in the center: …d6-d5 would be another bishop-blocker, and makes e6 backward; …e6-e5 leaves d6 backward, and where is that pawn headed, e4? 11…Qxe6 minimizes the pawn weaknesses (and avoids a king weakness), ahead of posting one knight or two on the e-file.</br>} 12.b3 {</br> By guarding c4, the e2-bishop is free to move from its defense. And by opening b2, the other bishop gets clear of the e3-hindrance, to roam unopposed on the long diagonal.</br>} 12...Nbd7 {</br> Both sides complete their minor-piece development.</br>} 13.Bb2 {</br> Naturally.</br>} 13...Ne5 {</br> Black’s game isn’t pretty, with problematic queenside pawns, and no deeper outpost for a knight than e5.</br>} 14.Qd4 {</br> If all the knights disappeared, White could checkmate on g7, but an implementation for that plan was probably less on White’s mind than provoking …c6-c5 to further weaken d6. (Shuffle the pieces in a sort of plausible Sicilian way: 1. e4 c5 2. Nf3 e6 3. d4 cxd4 4. Nxd4 Bc5 5. Be2 b6 6. c4 Bb7 7. Nc3 Bxd4 8. Qxd4 Nf6 9. O-O Nc6 10. Qd2 Qc7 11. b3 O-O 12. Bb2 d6; Stockfish thinks White has a significant lead in this similar, Maroczy Bind-like position; <em>diagram 2 below.</em> )</br>} 14...c5 {</br> The space is more or less equalized, and the imbalances remaining in White’s favor are sounder pawn structure, and the bishop pair. It’s still a position in which White might cultivate his small advantages.</br>} 15.Qd2 {</br> If White wants to build an attack on g7, he might play 15. Qf4 or 15. Qh4 before shifting to the g-file, but 15. Qd2 doesn’t rule that out, and watches the sore spot d6.</br>} 15...Rad8 {[#]</br> Black has one weak point, but there is only one. Single positional defects are usually manageable. Therefore, White aims to stretch the defense by broaching the kingside.</br>} 16.f4 ({</br> 16.Rad1 is simple development, and 16… Ne4 is a logical reply, seeking to relieve the less-wieldy position with a trade. White can gain a little more space and time: }16. Rad1 Ne4 17.Nxe4 Bxe4 18.f3 Bb7 19.e4 f5 20.f4 Ng6 21.exf5 Qxf5 {, but White’s advantages are unchanged: sounder pawn structure, preferable minor piece, more maneuvering room. A leading grandmaster like Euwe could continue milking that tiny lead (club players want to play this most-patient sort of chess, but it takes tactical awareness and endgame technique they don’t have), but he felt it was time to do something. </br>}) 16...Neg4 {</br> Backing away from White’s sacrificial attack enables the pressure on d6 to mount: 16…Ned7 17.Rad1, and if d6 falls, White’s advantages grow tangible. </br>} 17.Bxg4 {</br> Spurring the second knight from the b2-g7 diagonal</br>} 17...Nxg4 {</br> Forced.</br>} 18. e4 {</br> The first step toward smothering the kingside along with f4-f5, h2-h3, g2-g4. If White generates an initiative in that fashion, it’s tough to stop (in middlegames of opposite-colored bishops, the attacker is well favored because his bishop is unopposed).</br>} 18...Bxe4 {</br> Many chessplayers think Morphy played one game of chess in his entire life. Similarly, some think the only gauntlet Capablanca ever picked up was in that legendary Marshall Attack of 1918, but Black has involved himself in an active engagement here. 18…Bxe4 reduces the mobile pawn pair, and lends solidity to ….f7-f5. </br>} 19.Nxe4 {</br> This was White’s intent at move 16, but 19. h3 Nf6 20.f5 puts Black under considerably more pressure.</br>} 19...Qxe4 {</br> Else Black is a piece down for nothing.</br>} 20.Rfe1 {</br> You might question 19. Rfe1 (instead of 19. Rae1) because the f1-rook has scope, while the a1-rook is out of play. White might have been looking ahead to rook endgames in which the queen rook would land on d1.</br>} 20...Qb7 {</br> Dropping back to f5 or g6 exposes the queen to White’s pawn rush.</br>} 21.Bxg7 {</br> The upshot of 16. f4.</br>} 21...Kxg7 {</br> The dark-squared bishop mustn’t survive to dominate the the a1-h8 diagonal.</br>} 22.Qc3+ {</br> White doesn’t need the b2-bishop to checkmate at g7 if a rook joins the attack.</br>} 22...Kg8 {</br> Not 22…f6, because that pawn seeks to advance and clear the file for the rook.</br>} 23.h3 ( {</br> Black has greater rook activity on } 23.Qg3 f5 24.h3 d5 25.hxg4 dxc4 26.gxf5+ Qg7 27.Qxg7+ Kxg7 28.bxc4 Rd4 {</br>}) 23...f5 {</br> The knight can’t be saved: 23…Nh6 24.Qf6.</br>} 24.hxg4 {</br> White can’t let the knight escape to f6, and 24. Qg3 isn’t needed in that regard.</br>} 24...Qg7 {</br> The fork forces the swap of White’s most active piece.</br>} 25.Qxg7+ {</br> Otherwise the g4-pawn goes.</br>} 25...Kxg7 {</br> The only move.</br>} 26.gxf5 ({</br> White’s active rook is traded on } 26.Re7+ Rf7 27.Rxf7+ Kxf7 28.gxf5 d5 29.cxd5 Rxd5 {</br>}) 26...Rxf5 {</br> The rook is improved by this recapture: …d6-d5 is aided, and f4 is threatened. The players agreed that Black has sufficient rook activity after 27.Re7+ Kg6 28.Rxa7 d5.</br>} 1/2-1/2 You must activate JavaScript to enhance chess game visualization.
You must log in to post a comment.